
Welcome to Part 2 of the help defense series. If you are reading this at Worlds I hope you are playing well and having a wonderful time.
At the end of last week’s post I promised a look at handler help defense, but as I prepared for and talked to people about this week, I realized I wasn’t ready to tackle that issue just yet. What I really need to take care of is some more basic thinking about help defense, particularly in relation to specific offensive structures. So much of playing defense is situational. In fact, once you move beyond the basics of sticking with your assignment, forcing, and some rudimentary footwork, all defense is specifics. How you play in the wind or on a handler or on a taller cutter or with a sidelined disc or with a developing give-and-go…there are so many tiny details to be learned and mastered. Help-man defense isn’t any different from any other defensive technique in this regard. Last week we looked at the very first layer of thinking about help-man; this week we’ll look at the next layer down. This means taking a look at distinct helps and rotations for specific formations and situations. Just be aware that like all defense, there are a million what-ifs, hypotheticals and possibilities that have to be learned and that this post covers initial guidelines that serve as a foundation for these details.
There is an essential technique and concept that comes up several times in this week’s post: the idea of separation vs commitment. Often help defenses are destroyed by way, way, way too much separation. When you think of the over the hill city leaguer who never covers his assignment, this is the player who has allowed too much separation. It is essential that you are able to recover to your assignment should the need arise. The trick here is to play with commitment, but with as minimal separation as possible. As an example, imagine a simple two person in-out split. There is no reason for the backing defender to be ten yards deeper than everyone else. One yard and 100% commitment to covering the out will suffice. Only dropping a single yard also puts the defender in position to recover should the circumstance require it.
Another key technique is recover, switch, or cascade. A recover is when you help briefly and then return to your assignment. A switch is when you trade assignments with another player. A cascade is a series of assignment changes involving multiple defenders where the assignments change sequentially as first one and then another then another problem is addressed. In theory, a cascade could go on and on, but functionally they are a mess if they get beyond four players and it’s usually best to have everyone match up cleanly at that point.
Vertical
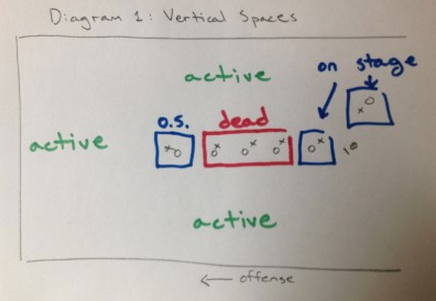
I am going to address side stack later, so vertical here means a well-defined central stack with active spaces on either side of the stack. Typically there will be a single dump, but there are variations with no dump (80s) and two dumps (which isn’t very effective, so no one really uses it). In a vertical, the active spaces are on either side of the stack, the on-stage spaces are the front, back and reset parts of the stack and the dead space is the central portion of the stack. (Diagram 1)
Relying on the foundational principles, the defenders in the dead space should be looking to help. The best method is to have two of the dead space defenders help into each of the two lanes. (Diagram 2) The open side helper should drop 5-10 yards out in to the lane. The break side helper should play right in the middle of the stack with minimal separation but total commitment to defending the break side. These two defenders are looking to help teammates who are actively defending cuts in the lane and simultaneously protecting each other’s assignments. Depending on how the offense responds, this could end in any of the three outcomes: recover, switch or cascade. (That’s the next layer of detail down.)

Of all the positions on the field, it is most dangerous to play help off of the front of the stack. There is no one else around you to squeeze space and the thrower is right there within easy reach. Of course, both of these things are true of the reset, but a pass for a five yard loss is far, far less damaging than a pass for a five yard gain, particularly since that shot to the front of the stack almost always gives untrammeled access to the break side of the field.
Horizontal
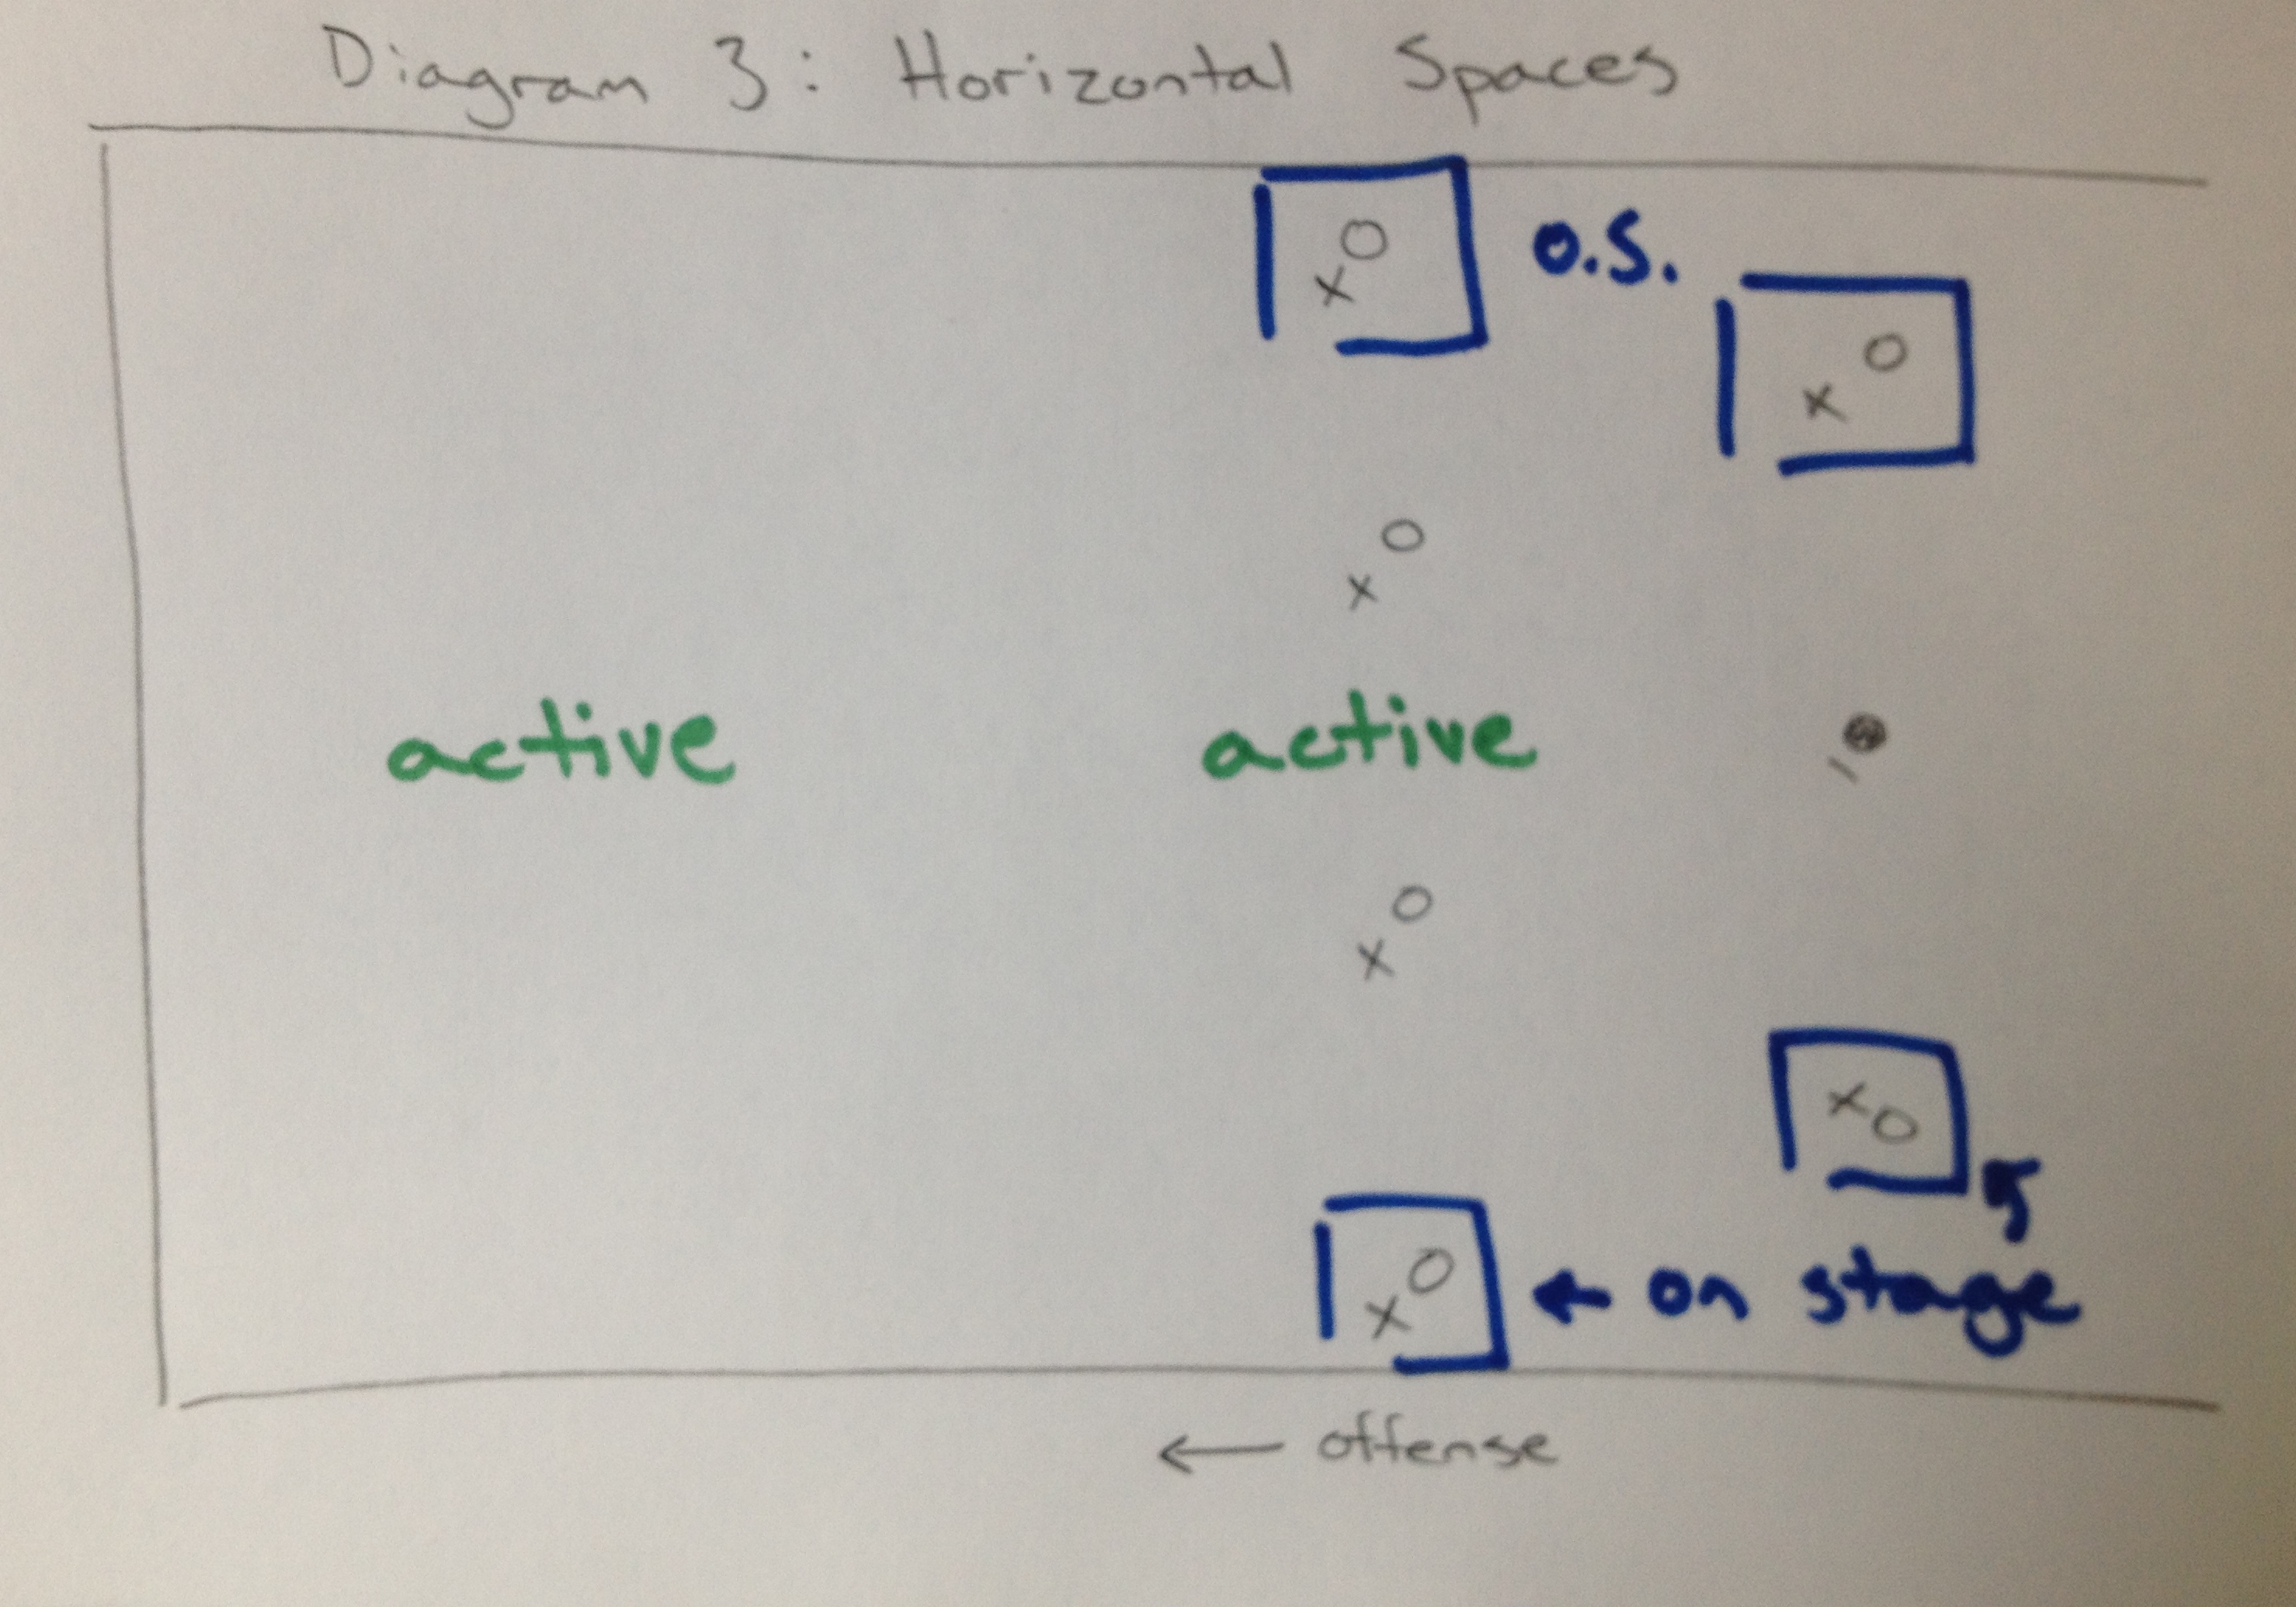
The strength of the horizontal is that all six of the players are either in active space (the two central cutters) or on-stage (the other four). (Diagram 3) The weakness is that two of those four on stage players, the resets, are in terrible position to threaten much more than a swing to the sideline and the sideline is a great place for the disc if you are the defense.
The classic way to play help defense on the horizontal is to leave the handlers, but since I am going to address handler help in detail later on, in this post I’ll look at how to help downfield. When the disc is in the center of the field (Diagram 4), the best way to help is to have the two side defenders drop off into deep space to protect the central defenders from the huck. The central defenders play the underneath. The challenge is that there are two throwing lanes coming back to the disc and the single underneath defender often gets split. It is essential that they play the interior lane and leave the outside lane to be squeezed by the handler defender. Alternatively, you can just bring the side defender from the break side, but they have to come a long way to be effective and that much separation often puts too much pressure on the marker to stop a pretty easy break for big yards. Really, the horizontal is very powerful from the middle of the field and you are best served using your help defense to drive the disc to the sideline where the offense will struggle much more.

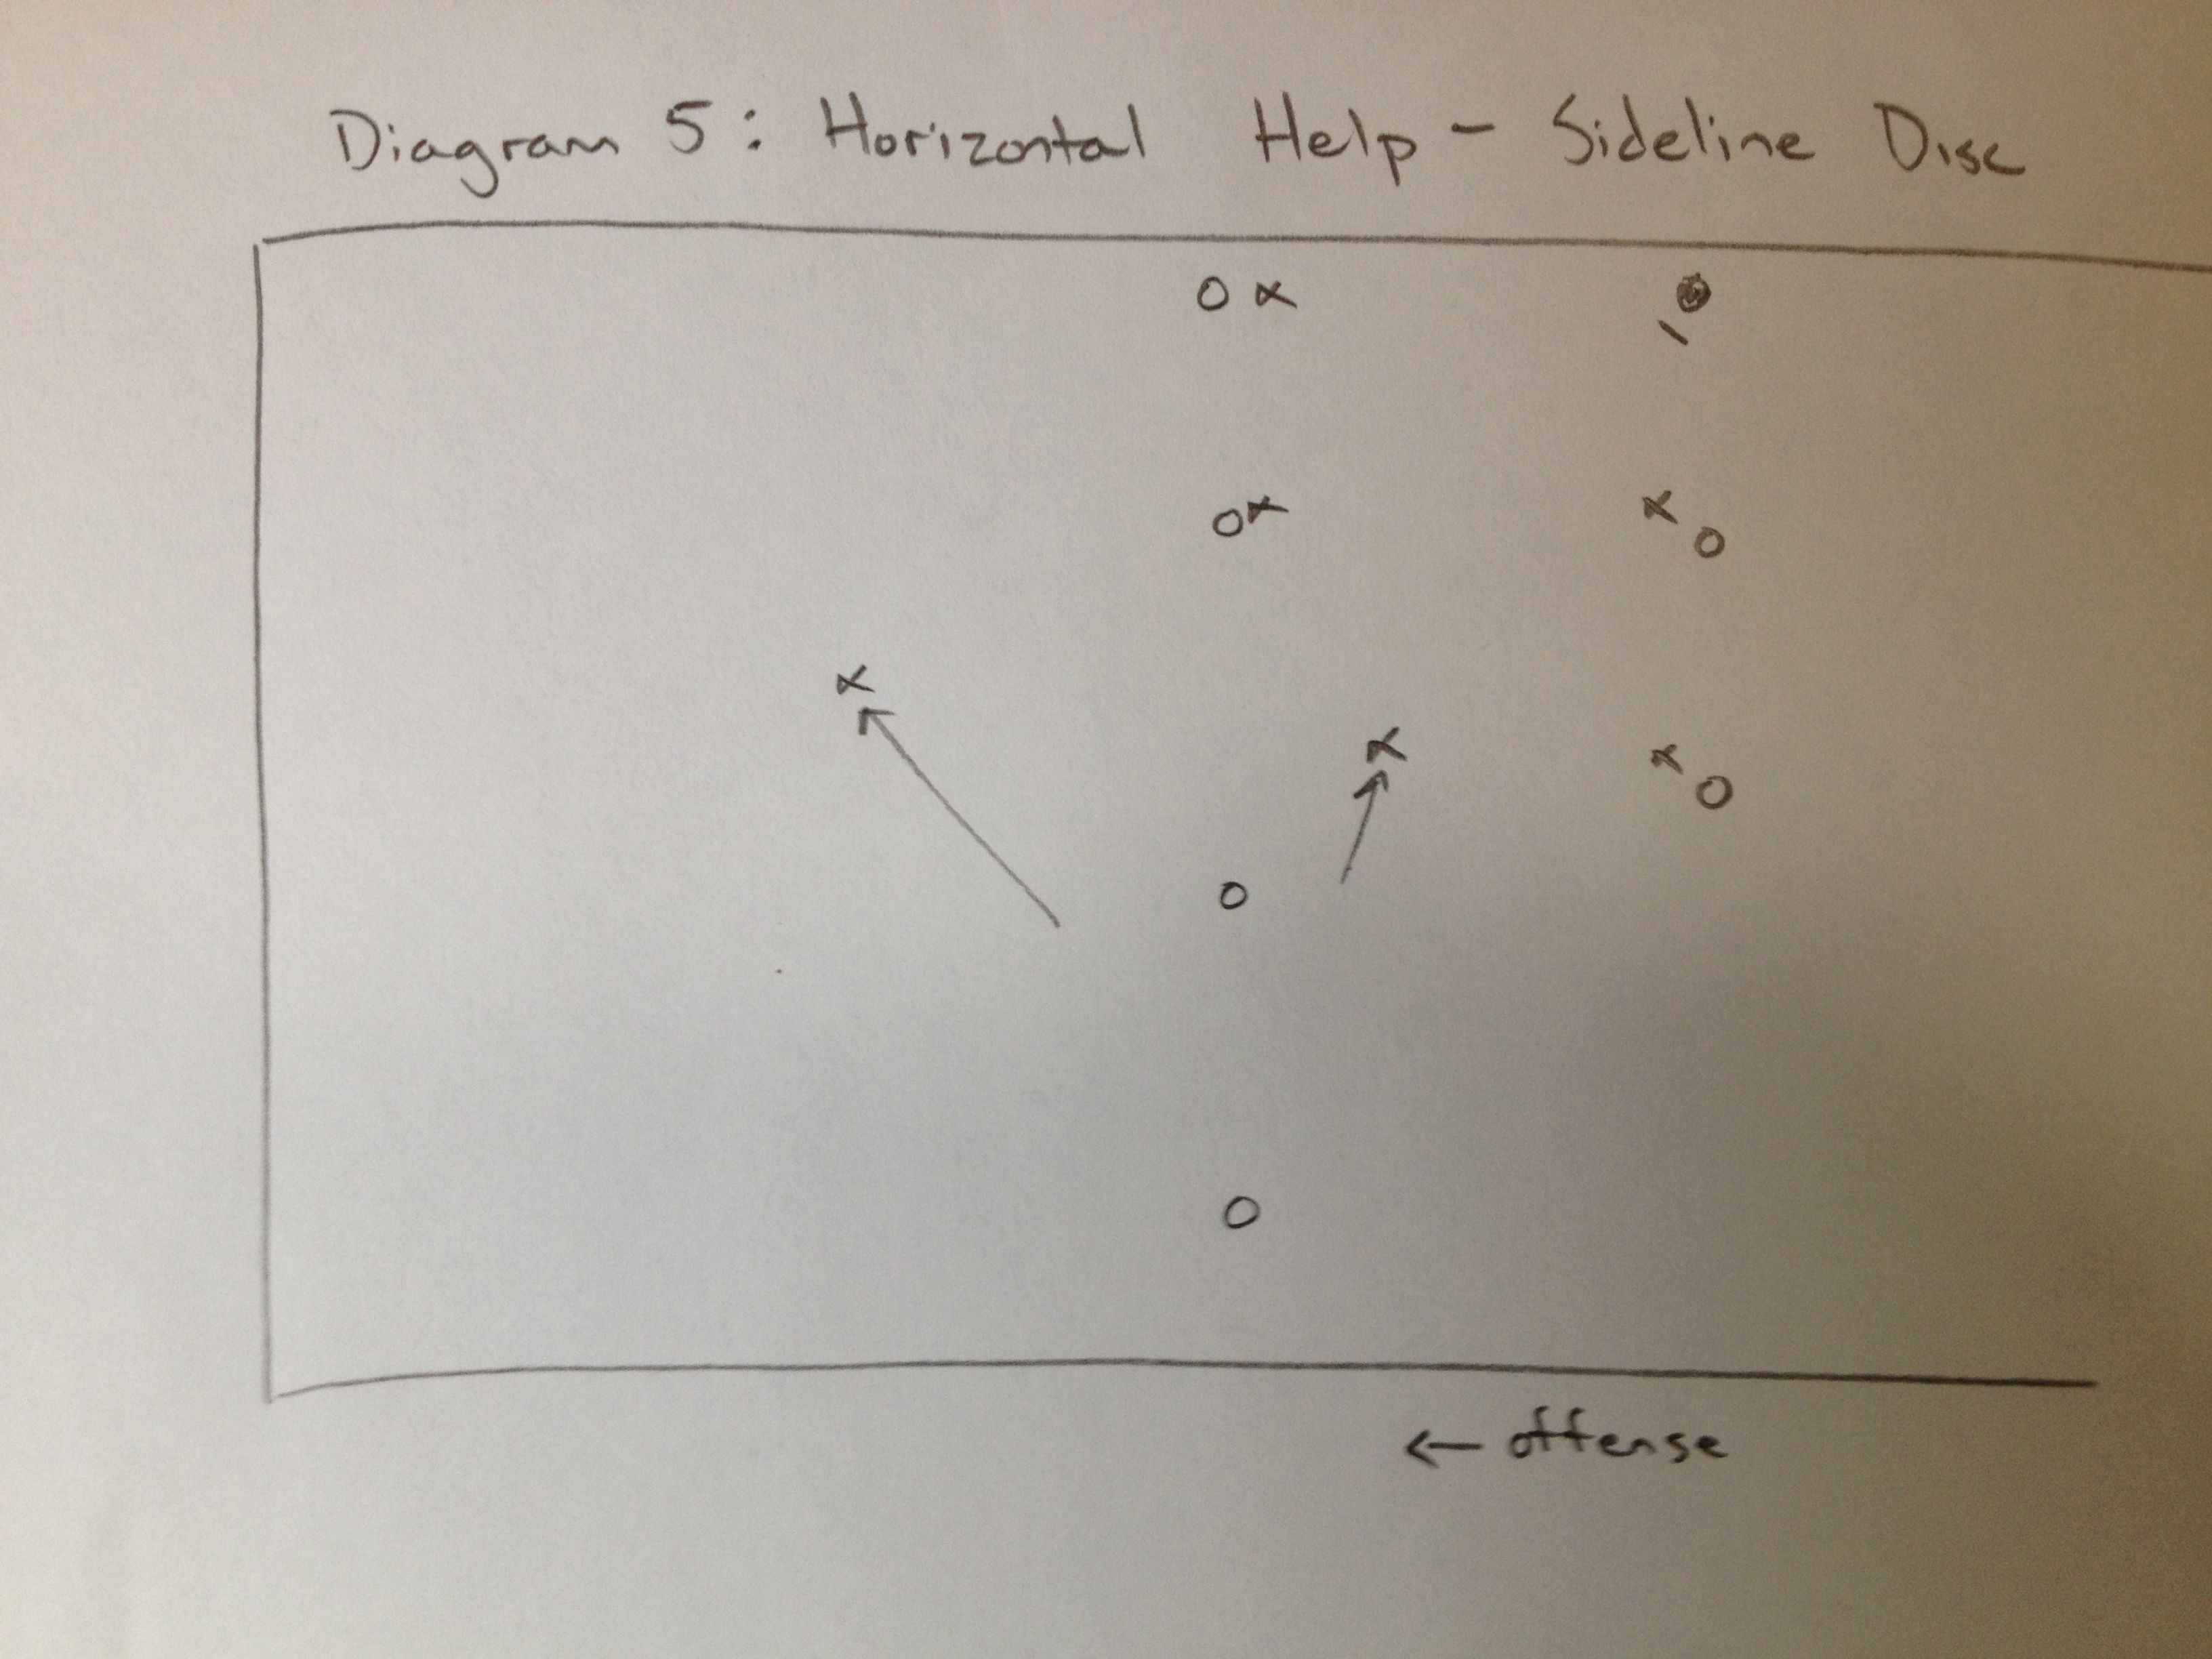
Once you’ve driven the disc to the sideline, (Diagram 5) the two weakside cutters are horribly positioned and both should be left stranded on the far side of the field. One defender should help deep, the other under. As with the vertical, they should be helping the strongside defenders who are defending active cutters while simultaneously supporting each other.
Side stack
There aren’t many teams who use this as a flow offense, but lots of teams run this as a pull play. This help system is 99% effective as long as you can live with shuffled match ups. The strength of the side stack is that it creates an ocean of space and the weakness is that it puts a lot of offensive players in some really dead space on the field. The strength is that a help defender is only effective by giving up a huge amount of separation and the weakness is that it is really hard for the offense to take advantage of that separation. (Diagram 6)

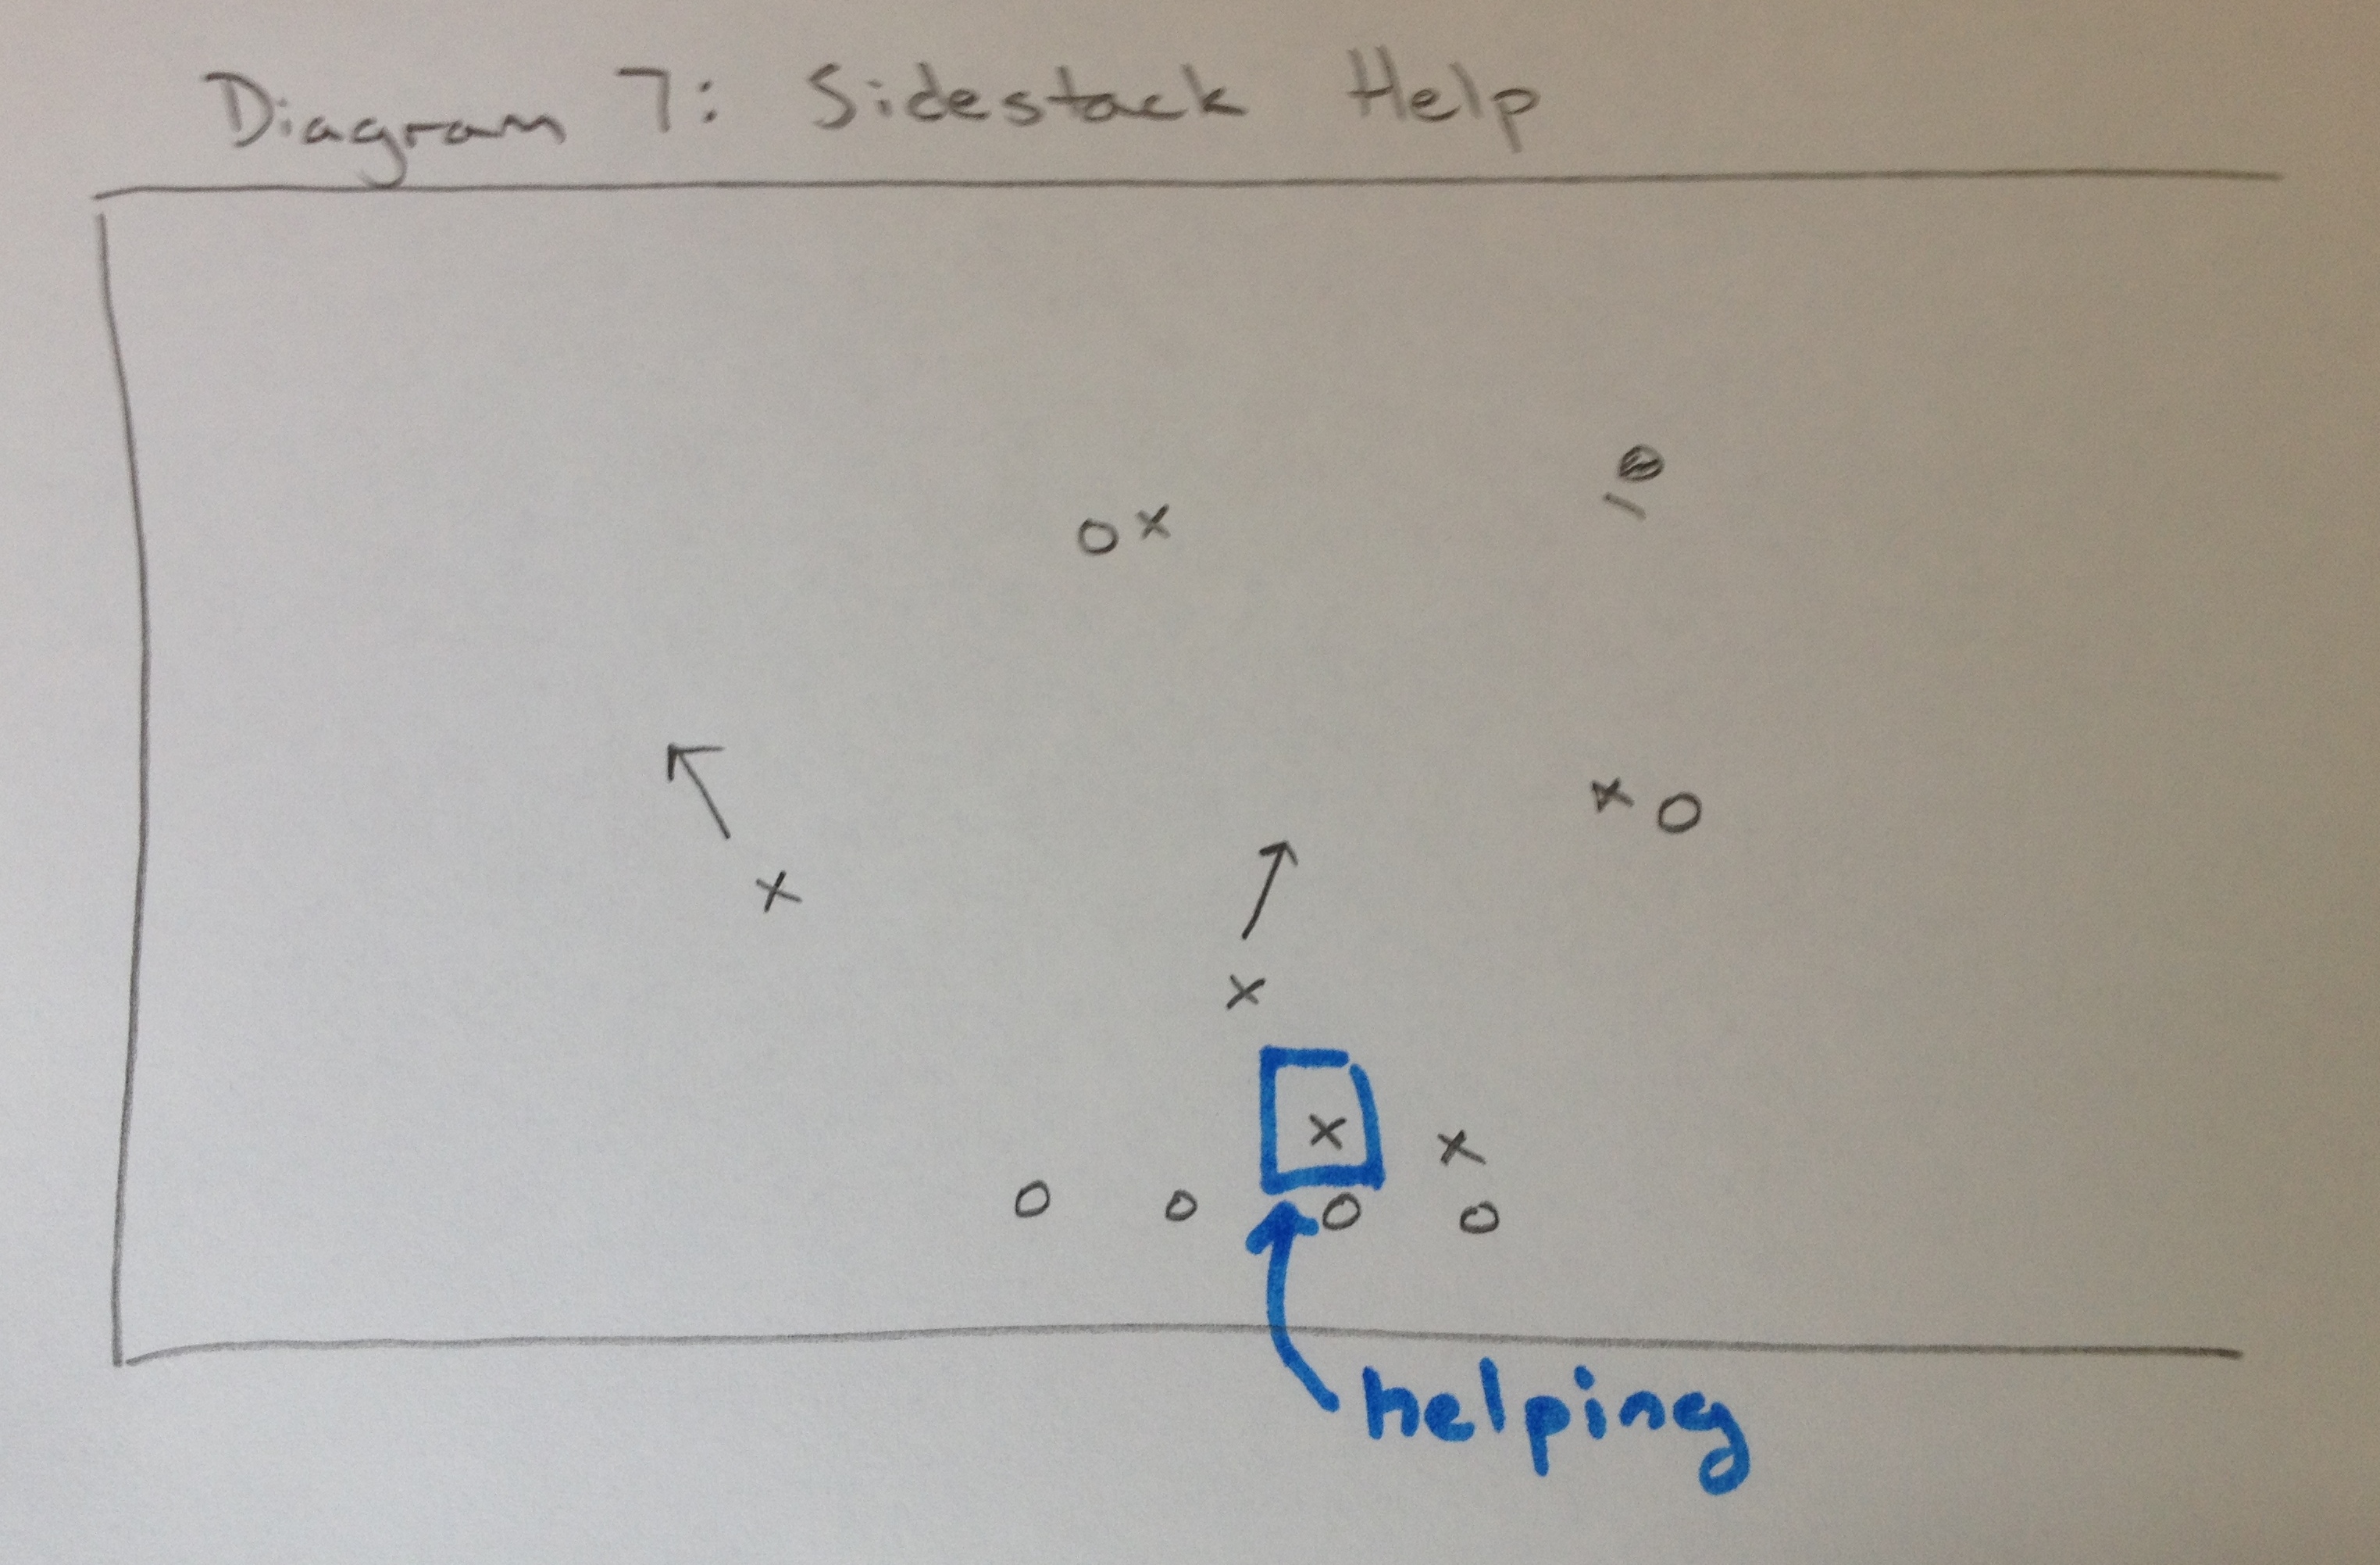
The help (Diagram 7) begins with the deepest defender in the side stack dropping out and playing as a deep-deep, allowing the active defender to front. Effectively they’ve double-teamed the active cutter. Two other side stack defenders operate very similarly to the help defense in the vertical: one of them drifts out into the lane and protects the central under lane and the other stays with the stack to react as necessary. (They are primarily responsible for containing flood plays and counter flow that are looking to take advantage of the help separation.) This help scenario almost always results in a cascade as the offensive players react and transition into flow.


Comments Policy: At Skyd, we value all legitimate contributions to the discussion of ultimate. However, please ensure your input is respectful. Hateful, slanderous, or disrespectful comments will be deleted. For grammatical, factual, and typographic errors, instead of leaving a comment, please e-mail our editors directly at editors [at] skydmagazine.com.