Skyd is happy to present the definitive guide to Ultimate photography from our friend Neil Gardner of nzsnaps.com. We had the pleasure of working with Neil at the World Ultimate Championships in Japan this year and were extremely impressed with his work. He’s written a great guide to the ins and outs of photographing Ultimate for us and we’ll be presenting it in several parts.
A Photographer’s Guide to Shooting Top Level Ultimate (it’s not all about the size of your lens!)
Part Two: Focus and Shot Selection
Part Three: Post-Processing and Packing List
Now that you have your images exposed well, how are you going to get them in focus? This is where the first real skill comes into it. Your camera will have multiple AutoFocus (AF) modes and will have at least One Shot and AI Servo (Canon terms). One Shot mode means that the camera will focus on something when you half press the shutter and lock there until you release the shutter button and refocus. This is fine for a static subject like a team photo, and the camera usually beeps to tell you it’s got focus – great, go ahead and click.
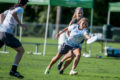
However, if someone is running towards you and you are in one shot mode, the camera may be able to focus on the player, but by the time you press the shutter button fully, the player is closer to you and the camera is focussed behind him or her! Click… throwaway image. AI Servo fixes that. In this mode, the camera acquires focus on an object and then tracks this object as best it can – even working out if the object is coming towards you or going away. This tracking means that after half a second or so the camera should be locked onto the object and you should be able to snap a series of images and all should be in focus (See figure 6 below). In fairness it’s not always the case, but AI Servo is the mode to use when shooting Ultimate. If you can use Manual Focus you’re a better masochist than I. I should point out that the accuracy and speed of the AF tracking is one area where a professional level camera and lens combo really does help a lot.
Tip: Your camera may have an AF mode called ‘AI Focus’ which allegedly combines the best of each AF mode. In my experience it combines the worst and is best avoided. Stick with AI Servo.
When I see something about to happen, I put the camera to my left eye (and keep my right eye open), half press the shutter button to acquire focus on the subject, then gently squeeze the shutter button to fire off a sequence of photos. The delay between the half press and the full press is important – you can’t expect the camera to instantly acquire focus. It has computations to do, and pieces of glass to move around first. With my gear I need to give it maybe quarter of a second to snap into focus. Cheaper gear typically takes longer, and this is usually a function of the lens, not the camera. A hint here is to constantly keep the lens focussed at approximately the distance of the action, so half press on a player to keep the lens focussed near where the action might happen – this means that when you do want to take a shot, the lens elements are already close to where they need to be and should lead to faster AF.

Figure 6: I saw this play start to happen and pre-focused on the Canadian player. I held down the shutter and all 5 frames were in focus even though the players were coming towards me all the time.
Tip: If you’re going to shoot all day, don’t shoot with one eye shut and the other up against the viewfinder. Figure out your dominant eye and learn to shoot with both eyes open. Not only will you see the action coming and catch a lot more of it, but you’ll avoid the painful eye spasms at the end of the day!
Now your photos are well exposed and in focus. The rest is easy.
Actually, sorry, I meant the opposite – We’re covered the easy parts so far. Now you need to learn the best places to shoot from and how to predict the action.
Where to shoot from is very subjective but please look at your background. I have lost count of the number of decent photos I have seen with a porta potty in the background. Just. Don’t.

Figure 7: This was the first photo I remember taking with the somewhat unfortunate background. I keep a much closer eye on backgrounds now.
I look for a space with the sun behind me (you want the sun lighting up the players faces wherever possible), where the background is clean or interesting (trees and crowds are great – although with crowds you need to be careful the action doesn’t get lost in the background). I often sit out the back of one end zone if there’s a gentle breeze that might encourage hucks to that end. A great end zone shot happened in Osaka during the women’s final… perfect light, great background, great action – it’s shots like these that make my day:

Figure 8: Sitting 4-5 metres behind the end zone with both my 300mm and 70-200mm lens, I saw this throw get made and quickly picked up the 70-200 to track the throw. USA’s Kaela Jorgensen (left) ended up laying out on D but Japan’s Hirai Eri was able to grab the disc for the score.
Roaming the sideline works well too, particularly if there are less hucks and more layout D bids close to the disc. Stay on the force side close or just downfield of the thrower and you should get layout bids coming right towards you. I’ll use the 70-200mm lens for this almost exclusively.
Keep clear of the play. The surest way to upset players and officials alike is to get in the way. The safest way to do this is to stay a few metres off the field and put your bag or equipment a few metres back again – however this isn’t always ideal. At world championship events, accredited photographers are given unfettered access to sidelines – even closer than the sideline players should be. Provided you have played at an elite level before or have observed a lot of high level Ultimate this shouldn’t be a problem. I have been known to even step onto the pitch (way behind the action) if a scoring throw is being made.
When you actually come to the moment of shooting a dive, or catch, or throw – should you mash the shutter button and take a sequence, or try and time the shot for the peak action moment? Peak action is a term I use to mean the most dramatic moment in a play, although often there are a couple. For example, the split second before a catch the hands are apart with the disc between them and the eyes of the player should be burning a hole in the disc (see Figure 8 above). A quarter of a second later and the player might have the disc in hand and be turning to look for a cutter. First photo is great, second photo might be ok. The same concept applies to a layout: the split second before the catch is great, the moment of the catch is good, a moment after is ok. But then you have the ground contact – there are some great faces pulled just as a player hits the ground.
Personally I mash the shutter – but this is another one of those situations where the gear you use can affect what you do. At 10 FPS, I have a better chance of catching the best shot with a shutter mash than by timing the shot, but with my old Canon EOS 10D (at 3 FPS) I had to time my first shot to try and catch the peak action. Try both and see what works for you.
After a point has been scored or when the game finishes – particularly if it’s a big point or game, there will be emotion on and off the field. Keep an eye out for this. Celebrations and disappointment can be very powerful.
Learn how teams play. Two teams that love hitting their longs with some classic flow typically make for better action shots than 2 teams grinding it out playing zone on each other every point. Zone is also harder to read from a ‘who’s gonna get it’ point of view, and the fact so many players are crossing over each other means that getting a clear frame and getting the focus on the action is much harder. I don’t like shooting zones.
If teams insist on playing zone and your best arguments to the captains about how the crowd wants to see more hucks are going nowhere, plant yourself by the goal line cone and hope for the best. There’s always the option of looking for another game to shoot if the zone is really serving up nothing interesting.
Should you be on the force or away side? Pick the force side if you can, then the action will probably be closer to you and the defenders should be closer to the offense so layout Ds might be a bit more frequent. Wind also makes a difference; more play tends to happen on the downwind side of the field. A strong wind trumps the force.
Don’t just shoot the action on field. Hear those players on the sideline yelling? They are full of adrenaline, highly emotional and often present a great profile. This is a great time to get close and use a large aperture to blur the background – check back on Figure 1 in the first part of my article.
What looks good in a photo?
- A layout (always better with two people involved – I’ll often delete or not process a layout shot if there’s only one player in the frame)
- The throw, preferably in the action of throwing, or with the disc a metre or 2 away (with a marker involved, the face can be either that of thrower or marker)
- A vertical contest for the disc with anything from two players to many – bonus points for highlighting a difference here… for example, a 6″5 guy with a massive leap skying a 5″10 guy on the ground.
- The disc in the photo – always adds something.
- FACES, FACES, FACES.
- The cutters downfield, in the blurred background of a thrower photo.
- Celebration photos of the point scorer or team members.
- Outpourings of emotion.
What doesn’t look good in a photo?
- Porta potties in the background (Figure 7)
- Backs of heads (This is not a hard and fast rule and I break it a lot, but faces are much better)
- A really cluttered background (unless by design, like a crowd – and you are able to blur it out a little)
- Action shots without the disc in frame (again, I break this guideline a lot, sometimes deliberately for effect, often because the faces are great)
I really like shooting the emotion in games, so I am not bashful about shooting the players on the sideline, the players in a huddle, or the emotion released after a game (happy or sad). Sometimes this is quite hard to do, and while shooting the winners is always a buzz and I’m sure no-one could conceivably mind, for every winner there is a loser and that team might have spent two years building up to this game. Do I feel bad shooting tears? Is it intrusive to snap a photo of someone releasing emotion after throwing a Callahan? Sometimes it’s hard, and sometimes I really feel bad for the players – but I still shoot because I think it would be unfair to only shoot the winners and I want to shoot teams that put so much in, mentally and physically, whether they win or lose. Some of my very favourite shots are from the seconds after the finals at WUCC and WUGC events where team-mates console each other after a loss (Figure 9).

Figure 9: Team USA's Nate Castine and Chase Sparling-Beckley after losing to Canada in a very tense Open Final at Worlds 2008
If anyone was to ask me to stop shooting them I would stop in an instant – I have no intention of being the paparazzi, but on another day they might be the winners and I’d like to shoot them then as well (Figure 10).

Figure 10: The ladies from Fury are clearly thrilled to have won at WUCC2010 in Prague
That’s it for focus and shot selection. Next, we take a look at what happens after the shooting is done for the day: sorting and post-processing.


Comments Policy: At Skyd, we value all legitimate contributions to the discussion of ultimate. However, please ensure your input is respectful. Hateful, slanderous, or disrespectful comments will be deleted. For grammatical, factual, and typographic errors, instead of leaving a comment, please e-mail our editors directly at editors [at] skydmagazine.com.