Skyd is happy to present the definitive guide to Ultimate photography from our friend Neil Gardner of nzsnaps.com. We had the pleasure of working with Neil at the World Ultimate Championships in Japan this year and were extremely impressed with his work. He’s written a great guide to the ins and outs of photographing Ultimate for us and we’ll be presenting it in several parts.
A Photographer’s Guide to Shooting Top Level Ultimate (it’s not all about the size of your lens!)
Part One: Gear and Exposure
Part Two: Focus and Shot Selection
Part Three: Post-Processing and Packing List
When I’m shooting Ultimate, without a doubt one of the most common comments I get is some variant of “That’s a huge lens…” often accompanied by a sly wink. My usual tongue in cheek response always gets a laugh from Ultimate players, but the reality is that great equipment doesn’t help as much as you might think when shooting Ultimate.
I’m sitting here on a Shinkansen (Bullet train) between Osaka and Tokyo, and it’s hard to believe another Ultimate World Championships has finished. I’ve been an official photographer at the last four world championship events (Perth, Vancouver, Prague and now WUGC2012 here in Japan) and during that time as a photographer I have fielded a lot of questions about my photos and how to shoot ultimate. I’m always happy to give advice on the fields, and I thought I would finally put together an article that once and for all tells people just why I take a huge lens all over the world.
I’ll get the gear out of the way first I shoot with great gear; it’s lovely, expensive, reliable, fast and heavy. I currently shoot with a pair of Canon Digital SLRs, a 1d4 and a 1d3, and my main lenses for Ultimate are a 70-200 F2.8L and a 300 F2.8L IS. You don’t need gear this expensive to get amazing photos though – Dave Sanders from ultimatephotos.org, for example, uses a really cheap consumer grade 90-300mm lens and, until recently, used a middle of the road Canon 30d DSLR. His photos are usually just as good as mine, but that’s because he knows my secret – more on that later.
Expensive gear like mine won’t make you take great photos – what it will do is make taking great photos a little bit easier, it’ll mean you get more of them, and in some cases you might get an action shot that you wouldn’t with a slower camera. I shoot in continuous mode, which on my cameras is 10 frames per second. Entry level DSLRs do 2-4 FPS and several middle of the range models now do 5-7 FPS. You can work around a low burst speed, but I choose not to – more images in a sequence means more chance of a killer shot, with no obscured faces and the shadows just right.
First and biggest tip: Don’t get hung up on the gear, any DSLR available today with almost any zoom lens CAN produce professional quality results.
So if it’s not (just) the gear, how do I get the shots I do? For a start, I take a lot of photos, but I only process about 10% of them. I looked at the shutter count on my cameras after the finals in Osaka and it looks like I snapped about 8500 photos over the tournament. That seems like an unmanageable number but I have a few tools to make it easier: I have a very critical eye and I prune a lot of images. In a typical day at an elite tournament I could easily shoot 1000 photos.
Before venturing out to shoot Ultimate (or any challenging subject) you need to be familiar with the capabilities of your camera and how to access the settings you will need. If you can’t remember how to change ISO quickly or how to change the metering mode, read the manual and practice.
On the fields, first check your settings. Is your ISO set to something sensible and not still on ISO3200 from the party night before? Here’s your first big decision, too: what exposure mode are you going to shoot in? I’m going to ignore the modes labelled ‘sport’ etc. on many cameras and stick to the traditional options. You have manual exposure (‘M mode’ where you set the aperture and shutter speed), Aperture priority (‘AV mode’ where you set the aperture and the camera figures out the shutter speed) and Shutter priority (‘TV mode’ where you set the shutter speed and the camera figures out the aperture). There’s also P mode (Program mode) which is some bastard halfling I never got to grips with and will therefore ignore.
It’s easiest to eliminate a mode first… I don’t use TV (Shutter priority) for ultimate except in very specific circumstances like wanting to do a blurred shot of someone running. TV is very useful for any sports with wheels where a high shutter speed will freeze the wheels of a car or bike and make them look like they are standing still. Ultimate players don’t have wheels, so let’s avoid TV mode.
Aperture priority (AV mode) is probably the best option for beginners and most experienced ultimate photographers. In this mode you set the aperture and just shoot away. With a big aperture (small F number like F2.8 or F4) you get those beautiful blurred backgrounds and a really thin part of the picture in focus. This is not very forgiving, but when you nail it, it looks great. Shooting ‘wide open’, as it’s called when you shoot with the largest aperture possible on your lens, is common in professional sports photography as you can really isolate the player even against a busy background.
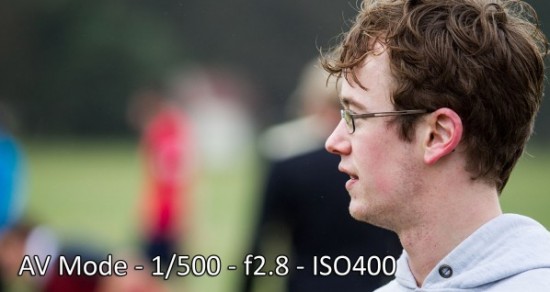
Figure 1: Shooting wide open - note the distracting building in the middle of the background? No? That's right, it's not recognisable!
If you want to take a team photo or scenery shot, it would be really annoying to have just the front row in focus, so you use a smaller aperture (bigger F number like F8 or F11 – also known as shooting ‘stopped down’). This means that more of the photo will be in focus. This has a couple of big downsides – 1) If you are shooting action with a small aperture, lots of the background will be in focus and it will be very distracting and 2) There is a direct trade-off between shutter speed and aperture. If you use a small aperture, you need a longer shutter speed for the correct exposure so you might end up with blurry shots.
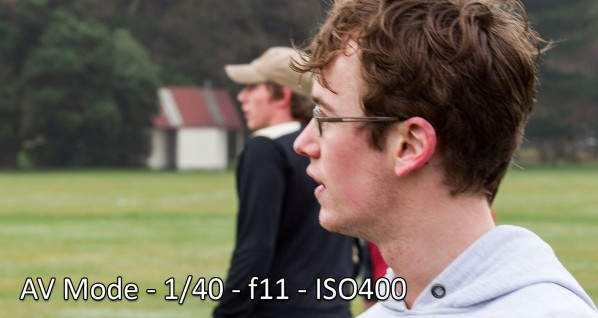
Figure 2: Shooting stopped down - note the distracting building in the middle of the background and the slow shutter speed causing a bit of blur.
Tip: Most lenses aren’t at their sharpest when ‘wide open’ (ie. at their smallest F.number). Generally however, the more expensive a lens, the better it will be wide open.
It’s also worth giving a quick explanation of how a camera decides what the correct exposure is. Basically, your camera is dumb – it doesn’t know that you are taking a photo of an awesome layout, all it can see is a bunch of light and it has to decide what the correct exposure is, and it does this by assuming that the scene (or whatever part of the scene you have told it to look at) is 18% grey. That’s a slightly technical way of saying that if you shoot someone against a bright sky, the camera will generally try and expose the sky correctly, but that means that the face of your player will be nearly black (Figure 3).
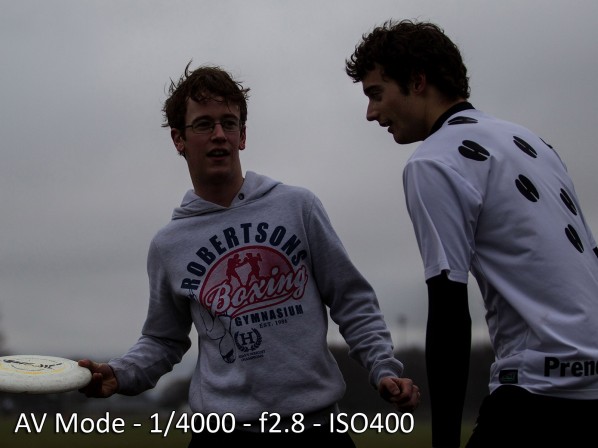
Figure 3: In this shot, the camera didn’t know the face was important and based the exposure on the whole scene - much of which was unimportant (very bright sky).
If you were to shoot the same person in the same light, but with a green grass or trees behind them instead of sky, the whole picture is closer to an 18% grey, and the exposure will be far more normal.
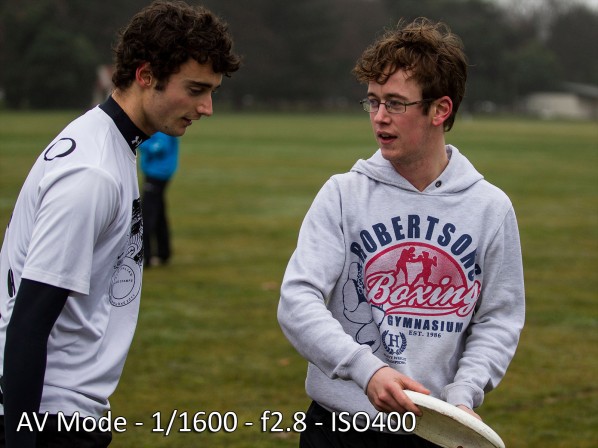
Figure 4: Taken 15 seconds after Figure 3, and with no changes to the camera settings, I swung around and shot the players against a dark background. The camera now saw a darker scene all over and changed the shutter speed to something that works better.
You can mitigate this problem in a couple of ways. Your camera will have an exposure compensation setting. You might tell the camera to deliberately overexpose by some value but this will only work sometimes. If, for example, you set the exposure compensation to account for the setup in figure 3 and then swing around like figure 4, the camera will now overexpose the whole image.
The other way is the way I do it now, and it’s using the final exposure mode I talked about – Manual exposure. In this mode I make all the decisions and let the camera just sort out the focusing. This is a high maintenance mode and requires test shots and checking settings every few minutes or even if a cloud comes over for a few seconds. You’ll also need to check and adjust the settings if you move and shoot from a different spot. It does however give the most predictable results when you are used to it, and I can control what part of the photo is exposed correctly. For Ultimate, this often means skies are way overexposed (blown out) but faces are nicely lit up like in Figure 5.
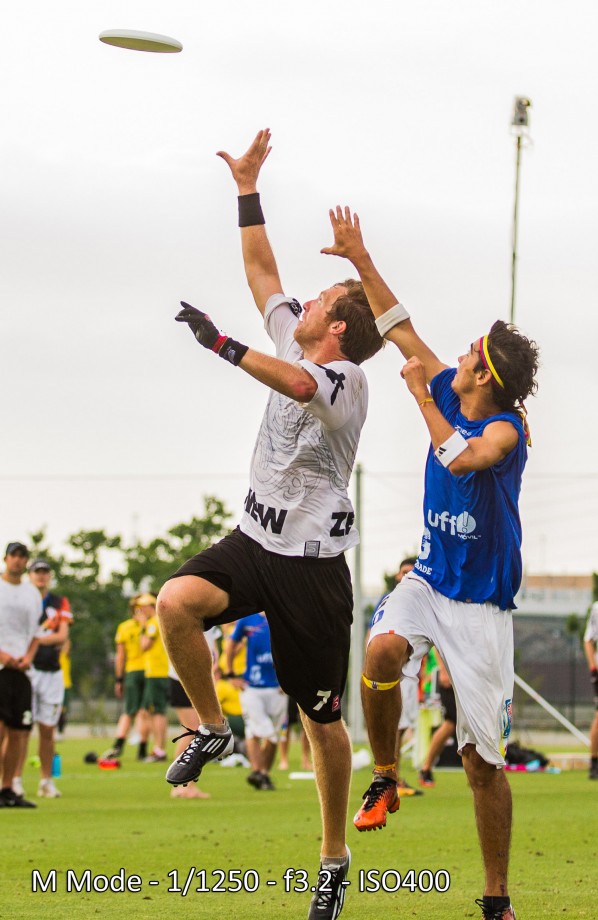
Figure 5: If I had let the camera use AV mode and decide the exposure on its own, there would be no detail in the player’s faces. Note the sky isn't quite as overexposed as it should be here due to gross liberties I took when processing the file.
I may not use manual exposure all the time. If, for example, I am standing between several fields and swinging around, or if there are very changeable light conditions then I will probably fall back on AV mode.
The other decision to make regarding exposure is ISO. This is a measure of sensitivity of the camera sensor and in a nutshell, the higher the ISO, the faster a shutter speed you can use, but the more visible noise (dot patterns) you’ll see in your photos. For a brightly lit day I typically start at ISO200 and move up or down as the day progresses or if cloud comes over. In later afternoon I might be up to ISO800 and under lights at night I could get up to ISO3200 to keep the shutter speed and aperture where I want them.
If you look at my photos it’s obvious that I also really try to avoid shooting against a bright sky – it’s just too hard to get a good exposure. If you can elevate yourself just a metre or so, this can make a big difference.
My typical settings during the day in Osaka were something like ISO100, F3.2 and 1/1600.
Phew… That’s exposure covered. In the next part of the article, we delve into getting your pictures in focus.






Comments Policy: At Skyd, we value all legitimate contributions to the discussion of ultimate. However, please ensure your input is respectful. Hateful, slanderous, or disrespectful comments will be deleted. For grammatical, factual, and typographic errors, instead of leaving a comment, please e-mail our editors directly at editors [at] skydmagazine.com.